Angular is very much well-known for performing very well with (SPA)Single Page Applications. In applications there are scenarios where we require a way to navigate between different views which are defined by components. To handle such scenario Angular has come up with so called Router. Going through way called Routing and tackling this situation is the answer to it and the same we are going to learn in this article. We will start with SPA and then we will understand Router.
| Single Page Application(SPA) will widely open understanding Router in Angular. In case if you do not know SPA we will quickly brief it in this paragraph. The name Single Page Application itself says that loading of whole application into a single page. It comes with a concept of loading application on a single master page, rather than loading whole page again refreshing only the portion required by maintaining constant header, footer and Menu part i.e. keeping it static when requested via clicks on links by the user. There will only be the portion which will keep on changing as per the request done by the user. |
|
|
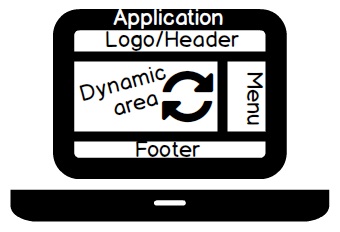
So in short site with common structure like header, footer and Menu part can be called as template of the site/app and it will be loaded for the first time including the dynamic portion. Thereafter only portion which is kept dynamic will be kept on changing on demand or depending on the page where user is surfing. Above is the pictorial image which shows current website structure used now days on the browser demonstrating SPS concept implemented on it. |
While working with any Angular project if we make use of Router it will enable navigation from one view to the other as and when user performs various tasks within the application.
Routing is meant and very much helpful in moving or navigating users to different pages based on the selection which they make it on the main page of the site. So based on the desired link option selected by the user the corresponding Angular Component will be invoked and it will be then served to the user.
Yes, it is very much possible to build a complete app or project in Angular without making use of routing. If we could skip it then, why Angular team has introduced it and people still use Routing in their project?
The reason lies behind is that if we opt out using routing, our app will completely going to be dependent on navigation through software program control. We will also have to keep switching out components based on user interpretation such as when user is clicking on something.
By making use of routing, we will be able make our life easy with the use smooth and can easily navigate by switching URLs. With that all respective components will map to their route and allowing us to move easily around within our app.
Hope above theory part on Angular explaining along with concept of Single Page Applications(SPA) is clear to the reader.
Next in this article we will go and move ahead with the practical's and demonstrate certain steps to create Routing in Angular. Readers please note that depending on your comfortability with the software or tool you wish to code on accordingly can be used like Visual Studio, Eclipse or VS Code.
We have used VS Code to create this learning article.
In order to make our basic Routing practical successful or application working we should at least two or more components. This is the most essential and important step that has to be done. Routes very well works in transition between views in which are defined within components. So every component created will have its own unique "View".
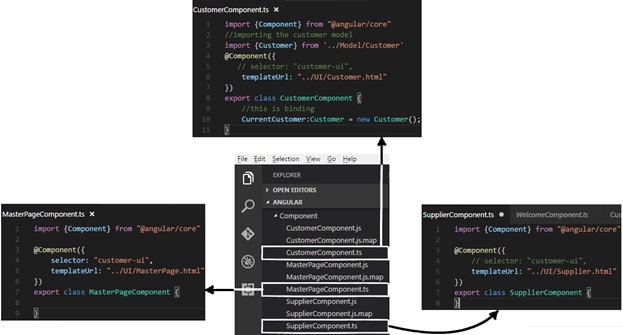
To make our learning like practical project in accordance to SPA concept we have create one master page like entity in it called "MasterpageComponent". Along with that there are there two more other components created name "CustomerComponent" and "SupplierComponent".
Below is the snapshot of the Explorer of VS Code showing the inner code details of each component created.
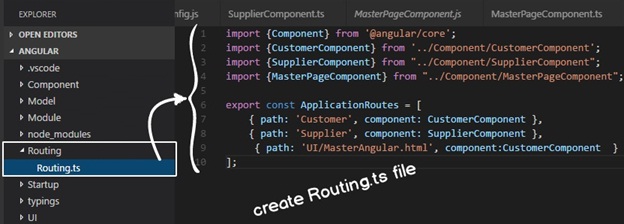
Now the second step is to do routing and for that we will create a separate folder altogether with name "Routing" and in that folder next we will create a "Routing.ts" file under Explorer in order to achieve Routing in our Angular project.
"Routing.ts" file will contain import for all the three components along with their respective path. For path details refer to the below image screen snapshot.
And it will be exposed outside via "export" keyword in order to consume by other files of our Angular project and named as "ApplicationRoutes".
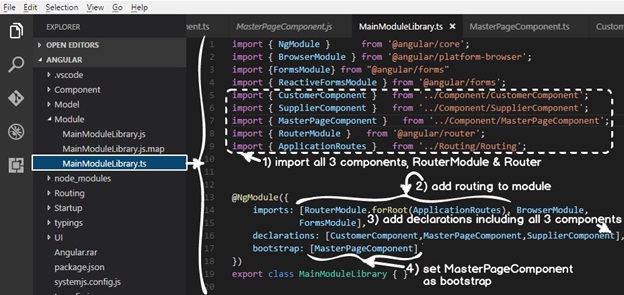
Once we are done with "Routing.ts" the next step we will move with step number 3. In this step we will create Module and show where and how to add Routing into it. For that go and create a typescript file with name "MainModuleLibrary.ts" under Explorer of Visual Studio.
Include the following within "MainModuleLibrary.ts" file.
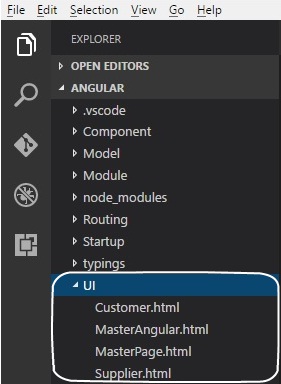
Now we have reached to final step where we will be creating html page which will be displayed when their respective component calls them. In our learning project we have CustomerComponent, SupplierComponent and MasterPageComponent for each of them there would be a separate html page.
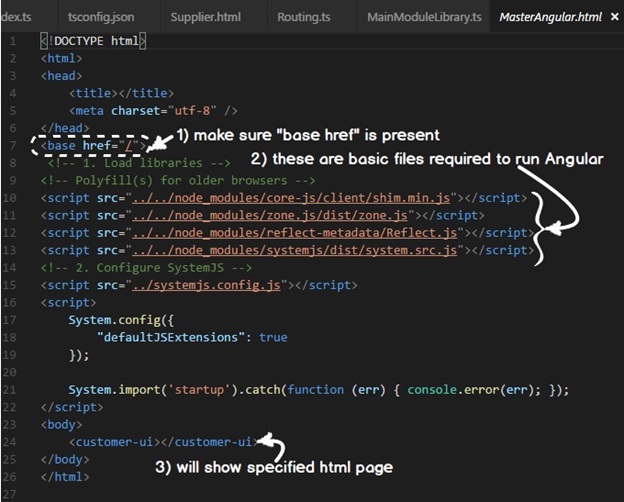
And the final html page we will create is "MasterAngular.html" under which our MasterPage.html will load and our project will work within it. This creation of "MasterAngular.html" page can be skipped but creating a project in a organized way is a good practice and moreover it will develop good habit. Create a new "UI" folder under Explorer and it will have all the following html pages.
|
|
It should have base href="/_" present. If you find that it is not present suggesting you to include the same.
Make sure "MasterAngular.html" page has available all the four basic files which are shim.js, zone.js, reflect.js and system.js present which is required to run Angular project.
And under the <body></body> specify the html page which will fulfill the requirement to display when "MasterAngular.html" page gets open. So the html page name specified in this location will be shown. We have specified "customer.html" and its writing convension is as follows
<customer-ui></customer-ui>
So it will display "customer.html" display when "MasterAngular.html" page gets open.
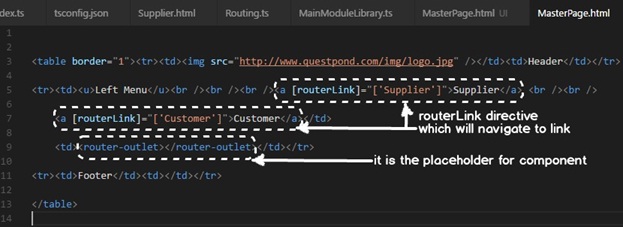
Here we have created table structure for "MasterPage.html" in order to give nice look and feel for our sample application. As discussed earlier in order to understand Routing we will use SPA concept, so the same we will apply here.Our html page is created using proper Header space, Footer space, Left Menu, and the dynamic region where page will be loaded as per wish of the user. And within that we will have "routerLink" and the "router-outlet". "routerLink" will be placed within the Menu region where it will have the links to navigate to other pages like "Supplier" and "Customer".
Please note that we have used here tables to demonstrate MasterPage.html page for standard looks. In case if you have good knowledge on HTML you can use <div> tag instead to flourish html page.
Well as the things are all set time to run the application and see the output. Now there is a requirement of "http-server" and for that go to Integrated Terminal of VS Code.
On VS Code under Menu bar click on "Integrated Terminal" then at the bottom of VS Code you will get command prompt which is nothing but "Intgrated Terminal". Under command prompt type command to run server, so type "http-server" which will run http server and will show the path and port on which it is running. Now use this path and port to run the application and for that just copy the path and paste it on the chrome browser address bar. Please note to use chrome browser to run application as it has better debugging capability of the angular web application.
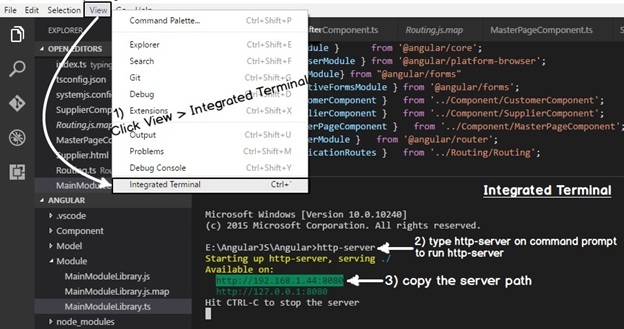
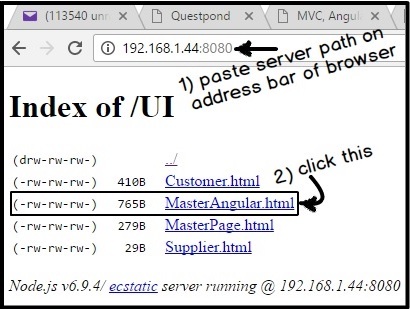
After providing the path on the addrees now press enter to execute application over here it which will show all the folder and files of the routing project. Remember that our Routing project is running within "MasterAngular.html" so first we have to click and open"MasterAngular.html".
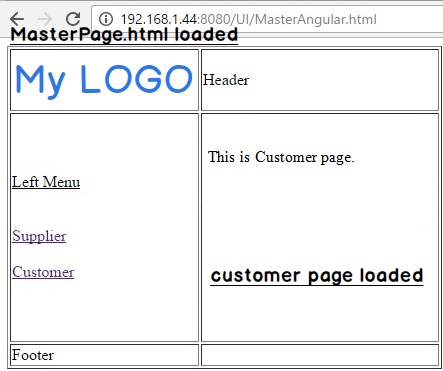
Once the "MasterAngular.html" page is loaded under it will open "MasterPage.html" which contain table and under it will have logo, Header, Menu, footer and dynamic portion included as SPA per concept which says common template containing static portion of logo, Header, Menu, footer and dynamic portion which will load content of either customer or supplier page as per user wish when clicked on link .
But when the "MasterPage.html" is loaded for the first time under "MasterAngular.html" it will bydefault load customer page within the dynamic region as shown down below image.
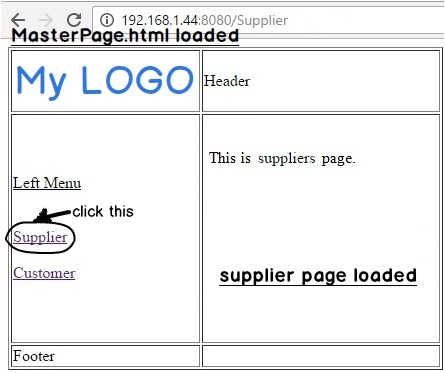
Now within Left Menu of "MasterPage.html" if we click on "Supplier" link which will open Supplier link in the address bar and load "Supplier.html" in the dynamic portion rest part which includes logo, Header, Left Menu and Footer portion will remain static. And if you look in the address bar it has loaded the keyword "Supplier" set as "routerLink" in "MasterPage.html" with this it fulfills the routing which is the agenda of this article.
If you wish to learn Angular using project based approach video based, recommending you as a reader to start with following video. This series of Angular progresses with each video covering theory and practical in parallel which balances and covers most of it: -