Whenever we build a project in Angular 2 step by step as a best practice we have to create a Startup.ts in case if you are using TypeScript. When Startup.ts file is created the very first thing we have to do is import four JavaScript files whose names are mentioned in the above title.
This write-up will be focusing and it will revolve around these four JavaScript files. We will understand its need and purpose why it is required, when we develop Angular 2 project.
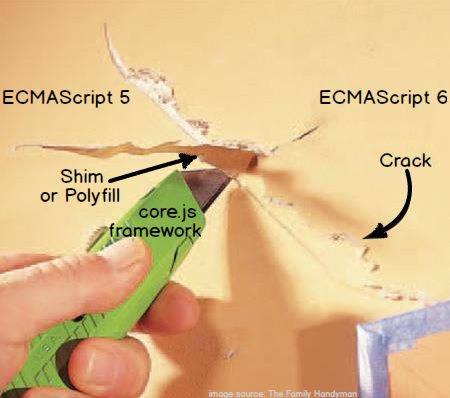
Starting with the first JavaScript file which is available under "core-js" framework called as "Shim.js" or when imported it is named "Shim.min.js" and sometime it is also referred to Polyfill. In general when we go through English meaning of "Shim" it means a thin layer usually used to fill in the gaps or to form a uniform surface in order to maintain smoothness or to give a smooth texture. Below is the pictorial representation for ease of understanding which shows filling of gap and make texture smooth with the help of Shim. So now you might be thinking what this word relates to? When we are learning Angular 2 or what is the connection of Shim with Angular 2? This word is very appropriate and perfectly fits here; let me explain it to you how?

Angular 2 is based on JavaScript and it has lots of version ECMAScript 5, ECMAScript 6 and now proposed version ECMAScript 7 is on its way and it will be out very soon(This is the current status of JavaScript version when this write-up is being written.) Now let us take an example of Internet Explorer 8 and below to that version which supports ECMAScript 5. And suppose if we have new syntax written in ECMAScript 6 then that won’t be supported by IE 8 version and it will show you an exception error. Here exception will be occurred because of there is a huge syntax difference between both versions of the JavaScript - ECMAScript 5 and ECMAScript 6 versions.
And this is what Shim.js does it does the filling of gaps between JavaScript versions so that the new syntax can also work in the old browser.
Shim.js helps remove to differences between different versions of JavaScript so that coding done in new JavaScript version can be easily supported by old version.
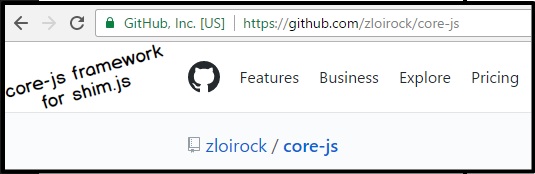
Shim.js can be easily found on GITHUB and it is available under core-js framework. Here below is the GITHUB screenshot for it, from where its installation can be done. "Shim.js" belongs to open source called as "core-js" framework which will ensures to fill in the gaps between different versions of JavaScript and make things work irrespective of version difference. There are other frameworks available on GITHUB which works exactly as "Shim.js" does of "core-js" framework but we have selected Shim.js" because it is approved and used by Angular 2 team.
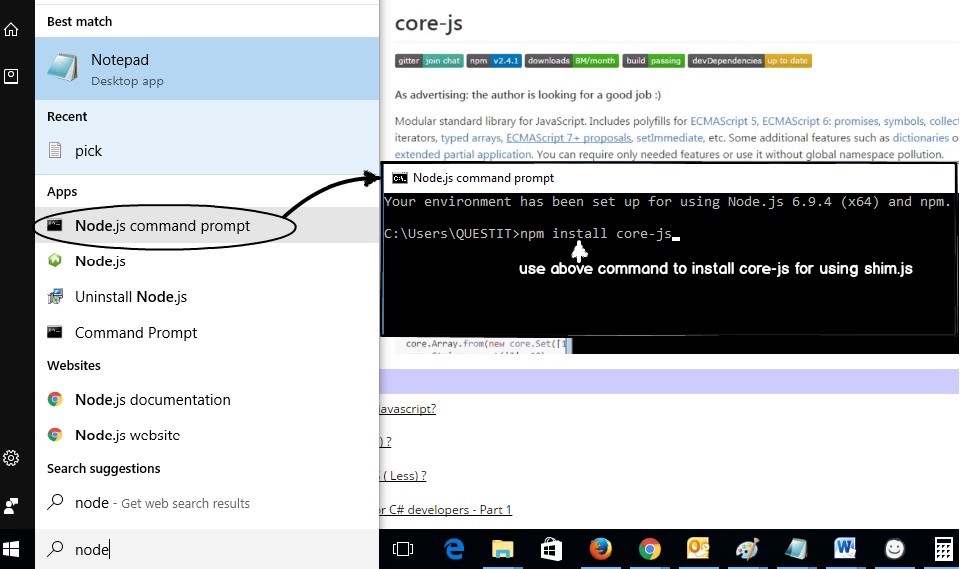
Now in order to get "core-js" from GITHUB and get installed in our system for Angular 2 project, do follow as shown in the image down below. Open Start Menu > go to "Node.js command prompt" and type the command once command prompt is open
npm install core-js
Please Note: npm is part of node.js which helps to do JavaScript framework installation. If you are new to node.js, refer to the following link
Once installation is done it will be available under "node_modules" folder within Angular 2 project. Now "Shim.js" can be used into Angular 2 project.
If we define zone.js which is given on the GITHUB site where it is available as download over there it is written a simple line – "A Zone is an execution context that persists across async tasks".
Let us understand what above single line of statement wants to state it allows the creator of the zone to observe and control execution of the code within the zone. It is created by importing zone.js library in the Angular 2 project or any JavaScript application. Angular 2 does the implementation of its own special zone which is called as NgZone. Making things running inside a zone allows one to detect when an asynchronous tasks (things) that can alter the internal state of an application, and because of that does its views "start and finish". Since these asynchronous tasks are the only thing that are going to cause our views to change, by detecting when they are executed Angular 2 knows that a view is required to be updated. This special zone extends the basic functionality of a zone to provide provision for change detection. Now what is change detection doing in Angular 2?
Change Detection basically takes the internal state of a program and ensure it easily get seen to the user interface. If you look it closely it is a state and it can be any kind of objects, arrays, primitives simply any kind of JavaScript data structures. Now this state may get end up as a form, paragraphs, links or like any buttons in the user interface and especially on the web, it’s going to be Document Object Model (DOM). In general we take data structures as input and create its DOM output to display it to the user and it is termed as rendering.
Here is the link https://github.com/angular/zone.js/ for GITHUB with which you can download and import "zone.js" into your Angular 2 project.
Below image shows Angular 2 application which is executing both synchronous task called function "a1" and asynchronous task called function "a2" under zone.js.
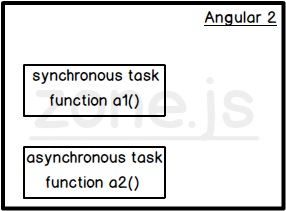
The useful part is that the zones "persist across async tasks", so an asynchronous task "a2" will run within the same zone that it was created along with synchronous task "a1". Zones just not only allow us to run code in their own work space area but it also allow us to hook into them in order to detect when asynchronous tasks "a2" start or got finish.
Reflect-Metadata is JavaScript open source library which acts as an Angular 2 polyfill and basically it helps in enabling attributes or metadata or decorators (called in Angular) for classes, methods and members. It is already present it the known languages like C# and Java so it is nothing new to programming world. While the external IDE program will read these decorators which seats on class and act accordingly in that way. So here goes the one-liner definition of Reflect-Metadata which will be used in Angular 2 project.
"Reflect Metadata allows a user to create decorator or to add metadata or specify attribute for his project classes."
So now you have understood reflect-metadata, purpose which it serves and following down below in this write-up we will see how this open JavaScript library can be integrated to achieve goals.
It is included in the Angular 2 project by doing installation that is done with the help of command which is written in the node.js command prompt
npm install reflect-metadata
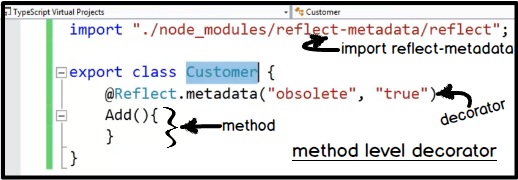
After you complete the installation via node.js command prompt now it is readily available to use it in your Angular 2 project. Just import it under your project by mentioning "import" syntax and installation path where reflect-metadata file is available as shown in the image down below.
With this you can now decorate by applying decorator on the class level on if you wish add metadata on the method level. Down below we have specified it just above to Add()method.
@Reflect.metadata("obsolete", "true
This type of representation of decorator above method level is called as method level decorator.
The last and important JavaScript file required under Angular 2 project within "index.html" file is "System.js". It is nothing but a module loader who understands how to utilize and use "exports" and "require" keywords thereafter it can create object and load JavaScript files. "System.js" is an implementation to "common.js" specification. In other words "system.js" module will helps to load JS files using module protocols like CommonJS, AMD or UMD. "System.js" works in hand with "Shim.js". Where "Shim.js" does the work of filling the gap between version of JavaScript so that new syntax can be used in the old browser who still uses old version while "System.js" in the index.html page are calling the "systemjs.config.js" file. This file will tell "System.js" which files to be loaded in the browser. Actual name of the file is "system.config.js" and it is defined and has a configuration JSON file which has system.js module loader. System.js is the one who commands browser where to look for the imported packages and all. "SystemJS" manage packages and their dependencies, so there is no need to worry about putting the packages in the right order to load them.
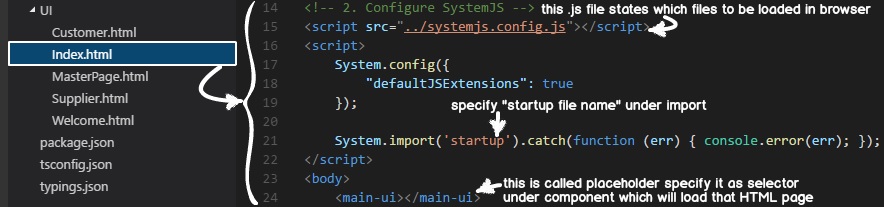
Below is the image screenshot from "index.html" showing the portion for configuring "SystemJS". Here mainly we have to configure three things. First specify the config file as "systemjs.config.js" file it will let know "SystemJS" which files to be loaded in the browser. Secondly under the "import" specify the file name which will be invoked at the start. And at last within the place holder specify the selector which is put under the component. And then that HTML page of that component will be loaded.
Hope that you got a brief understanding on Angular 2 dependencies now go and view the following project series video which will more enhance your learning :