In the previous labs we looked in to the following topics: -
In this Lab we will look in how to use jQuery with Angular.
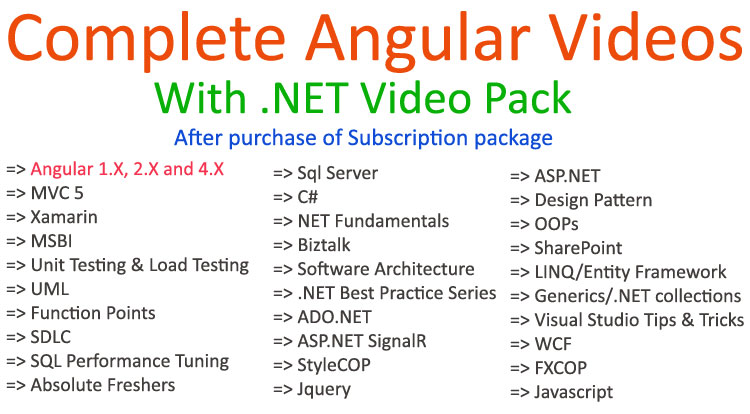
jQuery is a very old and trusted JavaScript framework. It has lot of UI components which are stable and trusted. As a practice, you should not use jQuery with Angular because both of them can overlap with DOM manipulation causing confusion.
jQuery manipulates HTML DOM directly using "$" syntaxes while Angular creates a sugar-coated DOM over HTML DOM and does the manipulation via this sugar-coated DOM. So jQuery can manipulate HTML DOM without Angular not having knowledge about this manipulation creating more confusion. |
|
But then there are instances when we would like to use jQuery UI components like jQuery grids, jQuery calendar and so on which probably are not available in Angular.
★ If Angular is your prime framework then first see that you get your solution inside Angular if not then use jQuery or any other framework.
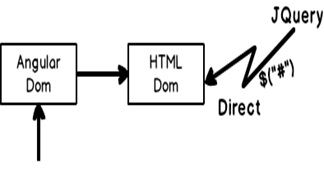
In this lab we will use jQuery to fade away and fade in our grid component. So let’s create a button with name Hide grid. When the end user clicks on hide grid the grid should gradually become visible and invisible.
So the first step is to get jQuery. Let’s fire up the node command and also let’s get jQuery as well as lets save the entry in to "package.json" file.
npm install jquery –save
JavaScript is divided in to two generations, one generation before typescript i.e. pure JavaScript and other generation after typescript. JavaScript is a dynamic and an untyped language while typescript is strongly typed. We can call methods which does not exist, assign variables which are not created as so on.
On other side typescript is strongly typed. Everything is done during design time / compile time, typescript has to know the methods, parameters everything upfront.
Now frameworks like jQuery are made in pure JavaScript, so if they need to be used in typescript we need to expose their types, parameters and so on. That’s where we need to create typing files. Typing’s are typescript files which expose the shape and structure of JavaScript objects so that typescript can understand JavaScript types during design time.
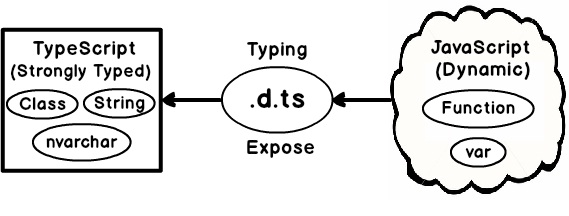
You must be wondering so do we need to create the typing’s file manually ?. No you do not need to. jQuery already has typing’s on the contrary almost all popular JavaScript frameworks have their typing’s file.
So to get the jQuery typing’s we need to do npm install by pointing at "@types/jquery". In fact you can load any types by using "@types" for example if you want to load lodash you can do "npm install" on "@types/lodash".
npm install @types/jquery –save
jQuery references HTML UI elements using selectors. In selectors, we need to provide name or ids by which we can get reference of that HTML element. So let’s wrap our "grid" component inside a DIV tag and lets assign some "id" value to it , like the one we have given in the below code "divgrid".
Also we have created a button which calls the "Fade" methods from the component.
<input (click)="Fade()" type="button" value="Hide Grid"/>
<div id="divgrid">
<grid-ui
      [grid-columns]="[{'colName':'CustomerCode'},{'colName':'CustomerName'},{'colName':'CustomerAmount'}]"
    [grid-data]="Customers"
    (grid-selected)="Select($event)"></grid-ui>
<div>
Now the first things is to import jQuery in to your component file. For that we need to use the below code. You can see the import statement is bit differently used. We are using "*" and "as" keyword. "*" means we want to refer full JQuery file and "$" is the alias by which we will be referring jQuery syntax in the code.
import * as $ from "jquery";
Once jQuery has been imported we can now use "$" to execute jQuery syntaxes. You can see we have created a method called as "Fade" in which we are referring the HTML DIV ID and calling the "fadeToggle" method to fade in and out.
import * as $ from "jquery";
export class CustomerComponent {
   // Code removed for clarity
   Fade(){
        $("#divgrid").fadeToggle(3000);
    }
	   }
Our JS files are loaded using SystemJS module loader. So we need to make an entry in to "Systemjs.config.js" file stating where the jQuery file is located.
'jquery': '../node_modules/jquery/dist/jquery.js'
If you see we have specified the folder path as "dist". "dist" stands for distribution folder. The final compiled copy of jQuery is in this folder so we have specified the same.
Now run the program and see the output. If you click on the "Hide" button you should see the grid fading out and in.