This article has two parts one will make you understand Webpack in case if you do not know and second part will deal by providing solution for Webpack Multiple entry/Multiple output issue.
So readers let us start the ride and try to learn more Webpack in Angular now days very popular and hot in GIT Hub. They can be installed easily via node.js and important part to know about Webpack is that it can be extended with the help of loaders. Custom code can also be written as loaders widely supports developers to write custom code for their required task that need to be carried out when bundling files together.
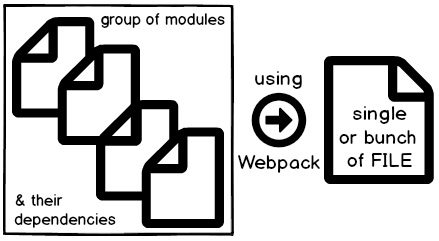
An open source JavaScript framework - Webpack is only meant for module bundling and it is an, in short Webpack is a module bundler. Now next question arises in mind what do you mean by Module bundling? In simple words it is a process of combining a group of modules along with their dependencies together into a single file (or a bunch of files). Dealing with this single-single module and their dependencies can be a challenging task and combining all them as a module bundler will make all the good difference.
Let us make above lines more sensible, clearer, simpler, practical and understanding to reader. A live projects using Angular for creating a web application comprises of lots of files without which project won't be complete files like JavaScript(.JS) files sometimes CSharp(.CS) files being created, HTML files are also part and we cannot forget files having images like bitmap, PNG etc. From project perspective all these created files may be dependent on each other to accomplish project task. Publishing or going for deployment Angular project having many such small individual dependent components or files along with their dependencies will lead to handling issue with all individual files or components when hosting on server. To address this issue Webpack is one such proposed solution for it given on the GIT hub and widely used in many of the projects driven by Angular. Basically it comes up with a simple idea where all the individual dependent files are bundled together and create a single file or bunch which showcases as single file. Webpack smartly bundles all individual files by looking at each of their dependencies on each other. Rather than dealing with many single files or unit Webpack does the work of bundling many files into a single file and gets hosted on the server and reduces the pain of looking into each single file.
We have complete dedicated article, refer to this link Webpack in Angular which explains in and out on working on Webpack. It will show installation using node.js command prompt, also explain and show you practically how Webpack recognizes dependency i.e. which file is dependent on whom etc. Get to see more on how Angular projects consisting of many Modules are handled using Modular approach.
This article is an extension which will surely give learning to the reader experienced while dealing with live issue faced while creating an Angular application which has multiple entry points or called lazy loading and errors seen while trying to achieve multiple output bundled JS for those multiple entries.
In recent time Webpack has added the prefix called "loader" and the whole issue was due to the same. This is a major change seen so far in Webpack, for more details you can read about the same here in this Webpack link shared.
Step 1 :- First forget old es6-promise then go and Get new "es6-promise-loader"
If you work with old es6-promise then you will continue to get errors instead of getting solution. In order to get it do installation using node.js for that first go to the node.js command prompt and do npm for getting new es6-promise-loader framework. Webpack requirement is which says that it needs a prefix loader https://github.com/webpack/webpack/releases/tag/v2.1.0-beta.26 so make sure that instead of using just "es6-promise" now we need to remember and use "es6-promise-loader".
Step 2: - Effective changes need to be done under Parent routing.
Earlier while using with es6-promise now make sure that it gets following changes done by mentioning under parent route which is loaded in "forRoots". Below is the sample code snippet shown down.
export const MainRoutes = [
    { path: 'Customer', loadChildren: () => require('es6-promise-
loader!../Modules/CustomerModule')('CustomerModule')},
    { path: 'Supplier', loadChildren: () => require('es6-promise-
loader!../Modules/SupplierModule')('SupplierModule') },
    { path: '', component: HomeComponent },
    { path: 'Shell.html', component: HomeComponent },
    { path: 'Help', component: HelpComponent, outlet: "helpoutlet" }


];
New changed code now has "LoadChildren" which is pointing towards anonymous function of "require" with es6-promise-loader.
Step 3: -New changes occurred in your webpack.config.js.
If you now see under "web.config.js" file will look something as shown below
var path = require('path');

module.exports = {
    entry: {
        CustomerModule: "./Modules/CustomerModule.js",
        SupplierModule: "./Modules/SupplierModule.js",
        Startup: [ "./node_modules/core-js/client/shim.min.js",
                    "./node_modules/zone.js/dist/zone.js",
                    "./node_modules/reflect-metadata/Reflect.js",
                    "./Startup.js"
                   ]
    },
    output: {
        path: path.join(__dirname, "dist"),
        publicPath: "/dist/",
        filename: "[name].bundle.js"
    }
};
Now the "web.config.js" file will get a new including "reflect.js" at Startup in the bundling. And the important point to remember is that "reflect.js" has to put ahead just before "Startup.js".
Step 4: - Execute Webpack.
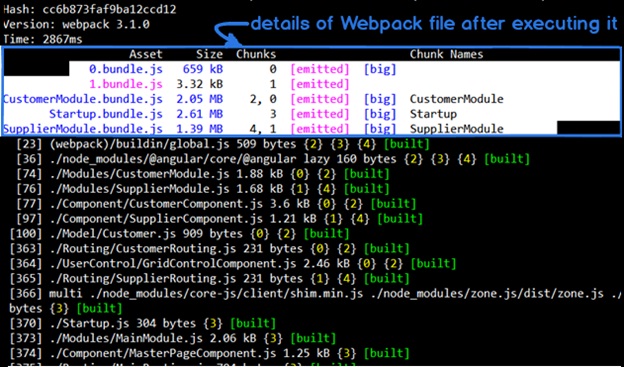
In order to do the same now go to the node.js command prompt browse the location i.e. jump to the path where the file called "webpack.config.js" is present as we all know there is no browsing option on command prompt as we see on windows, sorry for that J. Well now once you are on the location where "webpack.config.js" file is present next is to type the keyword Webpack on the command prompt and let run and execute the file.
Below is the screenshot shown with details of Webpack which just now got executed.
Step 5: - Remove all JS references file from Shell page.
And last but not the least time to go and remove all references to all .JS file from shell page file and only need to add just reference of the main startup bundle and by making these all changes congratulation you are now all set LIVE as published.
That's it, with things were fine and the error rectification was done successfully with that. May you as reader got to know the feel of the issue arises also hoping that got the essence of the solution provided and demonstrated in above steps.
After reading this article you will also like below shown Angular project series start-up video: -