Making HTTP calls using Angular - Hey friends welcome to Learn Angular Step by Step site, This is lab 9 article of an angular series.
Download Source Code For This Lab
In case you have missed the previous labs you can start from below links.
In lab 6 we have covered basic fundamentals of Angular like module, components, directives, expression and so on. To see this lab read lab 6 from here.
In lab 7 we have look in to how to create Single page applications using Angular routing. To see Lab 7 you need to read lab 7 from here.
In lab 8 we have understand how to implement validations using form, formgroup and formcontrol. You can see lab 8 by clicking on this link for lab 8.
If you are new to angular we would suggest to start from our below videos series which teaches Angular in 8 hours step by step.
HTML user interfaces are dead if there is no server side interaction. Normally in a web application we would like to send the data entered by end user to the server. On server side we would have some kind of service which can be created in technologies like Java, C# and so on. The server side technology can save, edit or delete this data in a database.
In simple words we need to understand how to make HTTP calls from Angular code to a server side technology.
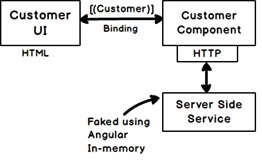
I intend to keep this book as a pure Angular book. So teaching server side technology like ASP.NET MVC , Java services , PHP is out of scope. So the server side service would be FAKED (Mocked) by using "Angular inmemory Webapi". Please note this is not a service which you will use for production its only for test and development purpose. In case you want to learn ASP.NET MVC you can start from this step by step MVC youtube video. |
|
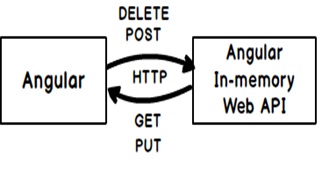
Even though we have decided that we will not be creating a professional server side service using ASP.NET , Java etc but we will still need one. So we will be using a fake service called as "Angular in-memory web api".
Already the "Angular inmemory web api" has been installed when we did npm. You can check your "package.json" file for the entry of "angular inmemory web api".
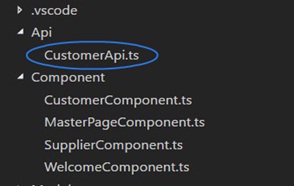
So let’s create a folder called as "Api" and in that lets add "CustomerApi.ts" file and in this file we will write code which will create a fake customer service. On this fake service we will make HTTP calls. |
|
Below is a simple service created using "angular-in-memory" open source. In this service we have loaded a simple "customers" collection with some sample customer records.
import { InMemoryDbService } from 'angular2-in-memory-web-api'
import {Customer} from "../Model/Customer"
export class CustomerApiService implements InMemoryDbService {
  createDb() {
    let customers =[
      { CustomerCode: '1001', CustomerName: 'Shiv' , CustomerAmount :100.23 },
      { CustomerCode: '1002', CustomerName: 'Shiv1' , CustomerAmount :1.23 },
      { CustomerCode: '1003', CustomerName: 'Shiv2' , CustomerAmount :10.23 },
      { CustomerCode: '1004', CustomerName: 'Shiv3' , CustomerAmount :700.23 }
    ]
    return {customers};
  }
}
So now when angular makes HTTP call it will hit this in-memory API. So when you make a HTTP GET it will return the above four records. When you make a HTTP POST it will add the data to the in-memory collection. In other words we do not need to create a professional server side service using ASP.NET or Java service. |
|
The next step is to import "HttpModule" from "angular/http" and in-memory API in to main module. Remember module is collection of components. So the "MainModule" has "CustomerComponent" , "SupplierComponent", "MasterpageComponent" and "WelcomeComponent".
import { HttpModule} from '@angular/http';
import {CustomerApiService} from "../Api/CustomerApi"
Also in the "NgModule" attribute in imports we need to specify "HttpModule" and "InMemoryWebApiModule".
@NgModule({
    imports: [….
        InMemoryWebApiModule.forRoot(CustomerApiService),
             …..,HttpModule],
    declarations: […],
    bootstrap: [….]
})
export class MainModuleLibrary { }
The next question comes which is the right place to put HTTP calls ?.
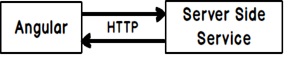
So if you see the normal architecture of Angular it is as follows: -
|
|
So let’s go ahead and import the Angular HTTP inside the Customer component.
import { Http, Response, Headers, RequestOptions } from '@angular/http';
We do not need to create object of HTTP using the new keyword, it will be dependency injected via the constructor. So on the constructor component we have defined the object injection of HTTP.
constructor(public http:Http){
    }
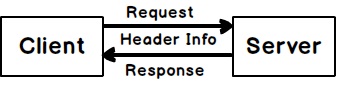
When we send HTTP request from client to server or we get response, header information is passed with the request and response. In header information we have things like content types , status , user agent and so on. |
|
So to create a request we need to first create a header and using that header create a request. One of the header information we need to provide is type of content we are sending to server is it XML , JSON etc.
Below is how to create a simple request using basic header information.
let headers = new Headers({'Content-Type': 'application/json'});
let options = new RequestOptions({ headers: headers });
Angular HTTP uses something called as observables. So angular is an observer and it subscribes to observable like HTTP response. In other words, its listening to data coming from the server.
So the below code says that we will be making a GET call to "api/customers" URL and when the data comes we will send the successful data to the "Success" function and when error occurs we will get it in "Error" function.
var observable = this.http.get("api/customers",  options);
        observable.subscribe(res => this.Success(res),
            res => this.Error(res));
Below is the code of Error and Success function. In "Success" function we are converting the response to JSON and assigning it to "Customers" collection which is in the component. If we have error we are displaying it in the browser console.
Error(err) {
        console.debug(err.json());
    }
    Success(res) {
        this.Customers = res.json().data;
    }
With all that wisdom we have gathered from Step 4 and Step 5 lets write down two functions one which will display data and the other which will post data.
Below is a simple "Display" function which makes a HTTP GET call.
Display(){
        let headers = new Headers({
            'Content-Type': 'application/json'
        });
        let options = new RequestOptions({ headers: headers });
        var observable = this.http.get("api/customers",  options);
        observable.subscribe(res => this.Success(res),
            res => this.Error(res));
    }
As soon as the customer UI is loaded the customer component object will be created. So in the constructor we have called the "Display" function to load the customers collection.
export class CustomerComponent {
// other code removed for clarity
constructor(public http:Http){
            this.Display();
    }
// other codes removed for clarity
}
Below is simple "Add" function which makes a POST call to the server. In http POST call code below you can see customer object sent as the third parameter.After the "Add" call we have made call to "Display" so that we can see the new data added on the server.
Add(){
           let headers = new Headers({
            'Content-Type': 'application/json'
        });
        var cust:any = {};
        cust.CustomerCode = this.CurrentCustomer.CustomerCode;
        cust.CustomerName = this.CurrentCustomer.CustomerName;
        cust.CustomerAmount = this.CurrentCustomer.CustomerAmount;
        let options = new RequestOptions({ headers: headers });
        var observable = this.http.post("api/customers",cust,  options);
        observable.subscribe(res => this.Success1(res),
            res => this.Error(res));
        this.Display();
    }
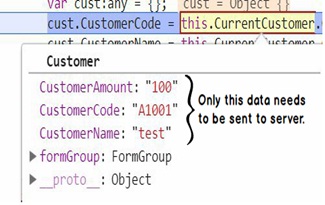
In the above "Add" function you can see the below code which creates a fresh light weight customer object. So why do we need to create this fresh new object ?.
        var cust:any = {};
        cust.CustomerCode = this.CurrentCustomer.CustomerCode;
        cust.CustomerName = this.CurrentCustomer.CustomerName;
        cust.CustomerAmount = this.CurrentCustomer.CustomerAmount;
The current customer object has lot of other things like validations , prototype object etc. So posting this whole object to the server does not make sense. We just want to send three properties "CustomerCode", "CustomerAmount" and "CustomerName". In other words we need to create a light weight DTO ( Data transfer object ) which just has those properties. |
|
Now that our component is completed we need to attach the "Add" function to the button using the "click" event of Angular. You can see that the (click) is inside a round bracket , in other words we are sending something(event click) from UI to the Object.
<input type="button"
value="Click" (click)="Add()" [disabled]="!(CurrentCustomer.formGroup.valid)"/>
Also we need to create a table in which we will use "ngFor" loop and display the customers collection on the HTML UI. In the below code we have created a temporary object "cust" which loops through the "Customers" collection and inside
<table>
    <tr>
        <td>Name</td>
         <td>code</td>
          <td>amount</td>
    </tr>
      <tr *ngFor="let cust of Customers">
        <td>{{cust.CustomerName}}</td>
         <td>{{cust.CustomerCode}}</td>
          <td>{{cust.CustomerAmount}}</td>
    </tr>
</table>
Go ahead and run the application. If you go and add "customer" object you should see the HTTP calls happening and the list getting loaded in the HTML table.
Download Source Code For This Lab