Contents
In the previous articles we looked in to Components and Modules Running your first Angular Application. In this article we will implement SPA (Single page application) concept using Angular routing.
Now a days Single page application ( SPA) has become the style of creating websites. In SPA we load only things which we need and nothing more than that.
|
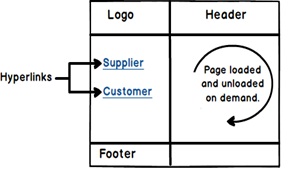
At the right-hand side is a simple website where we have Logo and header at the top, Left menu links and footer at the bottom. So the first time when user comes to the site all the sections of the master page will be loaded. But when user clicks on Supplier link only Supplier page will load and not logo, header and footer again. When user clicks on Customer link only Customer page will be loaded and not all other sections. Angular routing helps us to achieve the same. |
|
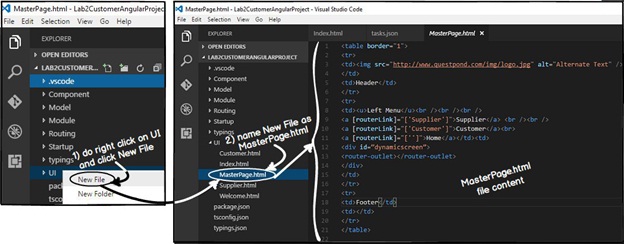
As everything revolves around the Master Page so the first logical step would be is to create the "MasterPage".
In this master page we will create placeholders for logo , header , menu , footer , copyright and so on. These sections will be loaded only once when the user browses the website first time. And in the later times only pages which are needed will be loaded on demand.
Below is the sample HTML code which has all the placeholder sections. You can also see in this code we have kept a "DIV" tag section in which we would loading the pages on-demand.

Below is the overall main sections of "MasterPage". Please note the "DIV" section with name "dynamicscreen" where we intend to load screens dynamically. We will fill these sections later.
<table border="1">
<tr>
<td>Logo</td>
<td>Header</td>
</tr>
<tr>
<td>Left Menu</td>
<td>
<div id="dynamicscreen">
  Dynamic screen will be loaded here
</div>
</td>
</tr>
<tr>
<td>Footer</td>
<td>Copyright</td>
</tr>
</table>
Let's create two more HTML UI one "Supplier" page and "Welcome" page.In both these HTML pages we are not doing much , we have just greeting messages.
Below is the supplier pages text.
This is the Suppliers page
Below is welcome pages text.
Welcome to the website
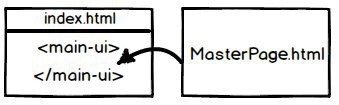
As explained in Part 1 "Index.html" is the startup page and it bootstraps all other pages using systemjs. In the previous lesson inside "Index.html" , "Customer.html" page was loading. But now that we have master page so inside index page "MasterPage.html" will load.
So to make it more meaningful lets rename "customer-ui" tag to "main-ui". In this "main-ui" section we will load the master page and when end user clicks on the master page left menu links supplier , customer and welcome pages will load.
<body>
<main-ui></main-ui>
</body>
So if look at the flow , first index.html will get loaded and then inside the "main-ui" , "masterpage.html" gets loaded. |
|
Now the first page to load in the index.html will be Masterpage and not Customer page. So we need to remove the selector from "CustomerComponent.ts". This selector will be moved to masterpage component in the later sections.
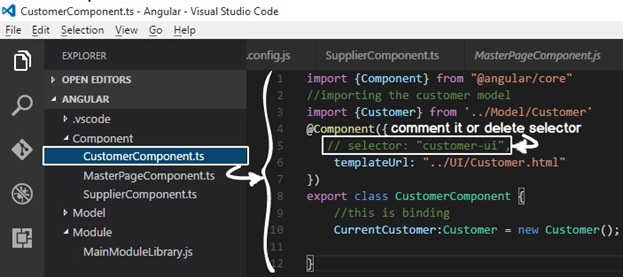
The final code of "CustomerComponent.ts" would look something as show below.
import {Component} from "@angular/core"
//importing the customer model
import {Customer} from '../Model/Customer'
@Component({
    templateUrl: "../UI/Customer.html"
})
export class CustomerComponent {
    //this is binding
    CurrentCustomer:Customer = new Customer();

}
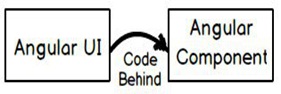
Every UI which is Angular enabled should have component code file. We have created 3 user interfaces so we need three component code files for the same. In the component folder, we will create three component TS files "MasterPageComponent.ts" , "SupplierComponent.ts" and "WelcomeComponent.ts". You can visualize component code files as code behind for Angular UI. |
|
So first let's start with "MasterPage.html" component which we have named as "MasterPageComponent.ts". This master page will get loaded in "Index.html" in the initial bootstrapping process. You can see in this component we have put the selector and this will be the only component which will have the selector.
import {Component} from "@angular/core"

@Component({
    selector: "main-ui",
    templateUrl: "../UI/MasterPage.html"
})
export class MasterPageComponent {
}
Below is the component code for "Supplier.html".
import {Component} from "@angular/core"

@Component({

    templateUrl: "../UI/Supplier.html"
})
export class SupplierComponent {
}
Below is the component code for "Welcome.html". Both Supplier and Welcome component do not have the selector , only the master page component has it as it will be the startup UI which will get loadedin index page.
import {Component} from "@angular/core"

@Component({
    templateUrl: "../UI/Welcome.html"
})
export class WelcomeComponent {
}
Once the master page is loaded in the index page, end user will click on the master page links to browse to supplier page, customer page and so on.Now in order that the user can browse properly we need to define the navigation paths. These paths will be specified in the "href" tags in the later steps.
When these paths will be browsed, it will invoke the components and components will load the UI. Below is a simple table with three columns. The first column specifies the path pattern, second which component will invoke when these paths are browsed and the final column specifies the UI which will be loaded.
| Path/URL | Component | UI which will be loaded |
| / | WelcomeComponent.ts | Welcome.html |
| /Customer | CustomerComponent.ts | Customer.html |
| /Supplier | SupplierComponent.ts | Supplier.html |
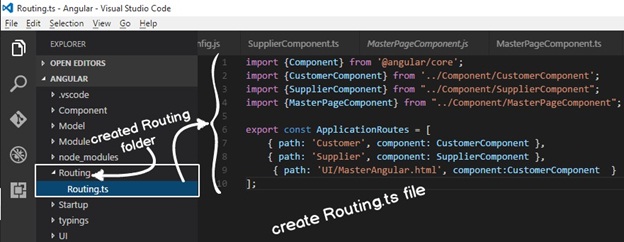
The paths and component entries needs to be defined in a simple literal collection as shown in the below code. You can see the "ApplicationRoutes" is a simple collection where we have defined path and the component which will be invoked. These entries are made as per the table specified at the top.
import {Component} from '@angular/core';
import {CustomerComponent} from '../Component/CustomerComponent';
import {SupplierComponent} from "../Component/SupplierComponent";
import {WelcomeComponent} from "../Component/WelcomeComponent";

export const ApplicationRoutes = [
    { path: 'Customer', component: CustomerComponent },
    { path: 'Supplier', component: SupplierComponent },
     { path: '', component:WelcomeComponent  }
];
As a good practice all the above code we have defined in a separate folder "routing" and in a separate file "routing.ts".
The navigation ( routes) defined in "Step 6" in the collectin needs to referred when we try to navigate inside the website. For example, in the master page we have defined the left menu hyperlinks.
So rather than using the "href" tag of HTML we need to use "[routerLink]"
<a href="Supplier.html">Supplier</a>
We need to use "[routerLink]" and the value of "[routerLink]" will be the path specified in the routes collection define the previous step. For example in the "ApplicationRoutes" collection we have made one entry for Supplier path we need to specify the path in the anchor tag as shown in the below code.
<a [routerLink]="['Supplier']">Supplier</a>
When the end user clicks on the left master page links the pages (supplier page, customer page and welcome page) will get loaded inside the "div" tag. For that we need to define "router-outlet" placeholder. Inside this placeholder pages will load and unload dynamically.
<div id="dynamicscreen">
<router-outlet></router-outlet>
</div>
So if we update the master page defined in "Step 1" with "router-link" and "router-outlet" we would end up with code something as shown below.
<table border="1">
<tr>
<td><img src="http://www.questpond.com/img/logo.jpg" alt="Alternate Text" />
</td>
<td>Header</td></tr><tr>
<td><u>Left Menu</u><br /><br /><br />
<a [routerLink]="['Supplier']">Supplier</a> <br /><br />
<a [routerLink]="['Customer']">Customer</a></td><td>
<div id="dynamicscreen">
<router-outlet></router-outlet>
</div>
</td>
</tr>
<tr>
<td>Footer</td><td></td>
</tr>
</table>
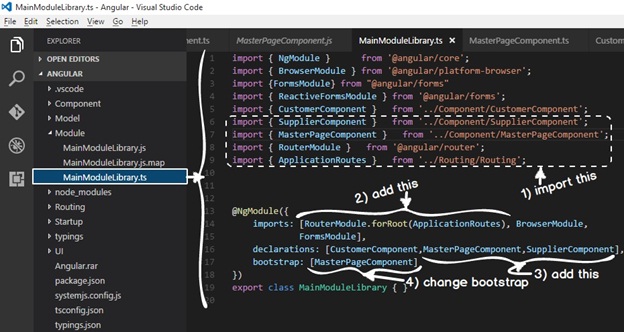
In order to enable routing collection paths defined in "ApplicationRoutes" we need to load that in the "MainModuleLibrary" as shown in the below code. "RouterModule.forRoot" helps load the application routes at the module level.
Once loaded at the module level it will be available to all the components for navigation purpose which is loaded inside this module.
@NgModule({
    imports: [RouterModule.forRoot(ApplicationRoutes),
             BrowserModule,
             FormsModule],
    declarations: [CustomerComponent,MasterPageComponent,SupplierComponent],
    bootstrap: [MasterPageComponent]
})
export class MainModuleLibrary { }
The complete code with routes would look something as shown below.
import { NgModule }      from '@angular/core';
import { BrowserModule } from '@angular/platform-browser';
import {FormsModule} from "@angular/forms"
import { CustomerComponent }   from '../Component/CustomerComponent';
import { SupplierComponent }   from '../Component/SupplierComponent';
import { MasterPageComponent }   from '../Component/MasterPageComponent';
import { RouterModule }   from '@angular/router';
import { ApplicationRoutes }   from '../Routing/Routing';

@NgModule({
    imports: [RouterModule.forRoot(ApplicationRoutes),
             BrowserModule,
             FormsModule],
    declarations: [CustomerComponent,MasterPageComponent,SupplierComponent],
    bootstrap: [MasterPageComponent]
})
export class MainModuleLibrary { }
Router module requires a root path. In other words "Supplier" route would become "companyname/Supplier" , "Customer" route would become "companyname/Customer" and so on. If you do not provide a route you would end up with error as shown below.
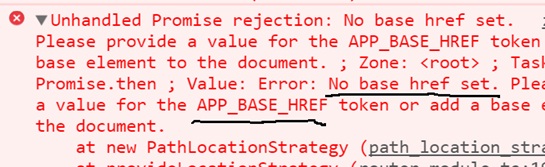
So in your "Index.html" we need add the HTML BASE HREF tag as show in the highlighted code below . At this moment we are not providing any root directory.
<!DOCTYPE html>
<html>
<head>
<title></title>
<meta charset="utf-8" />
</head>
<base href="./">
<!—Other code has been removed for clarity -->
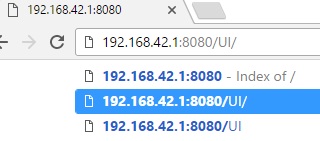
Now run the website and try to browser to UI folder and you should see the below animated video output. You can see that the logo gets loaded only once and later when the user is click on the supplier links , customer links image is not loading again and again.
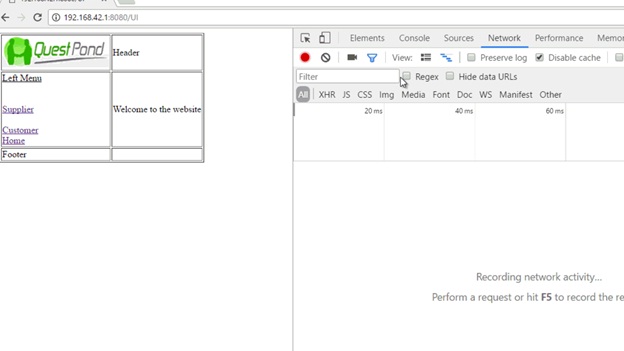
If you do a "f12" and check in the console part of the chrome browser , you would see the below error. Can you guess what the error is ?.
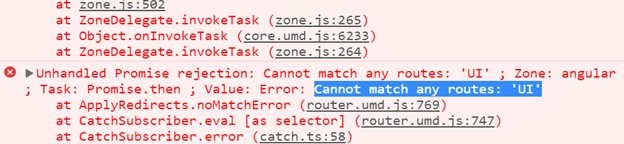
Your current angular application is route enabled. So every URL which is browsed is looked up in to routes collection. So that's why it throws up the above error. |
|
In order to fix the same make one more entry for "UI" path and point it to "WelcomeComponent".
export const ApplicationRoutes = [
    { path: 'Customer', component: CustomerComponent },
    { path: 'Supplier', component: SupplierComponent },
     { path: '', component:WelcomeComponent  },
    { path: 'UI', component:WelcomeComponent  }

];

Validation is one of the most important components in software application. In the next article, we will discuss how we can implement Angular validation using form group, form control and validation controls.