Contents
Lab 5:- Understanding Module Bundlers using WebPack
In the previous labs we looked in to the following topics: -
In this Lab we will look in to module bundlers using Webpack. Module loaders are runtime while module bundlers are more compile time.
In the previous Lab 4 systemJS was doing everything at the runtime. So in the browser it first loads "Customer.js" then "Address.js" and so on. If you have lot of dependencies you would end up with lot of requests.
|
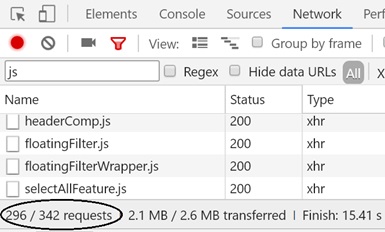
At the side is a simple image from an enterprise project where we have 342 JavaScript file requests to load the site. Now that's a big number and with so many requests your application performance will come down a lot. |
 |
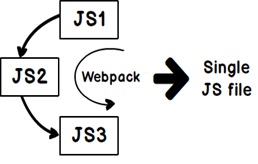
If we can create a SINGLE BUNDLE during the compile time itself, that would be a great performance booster.
|
That's where webpack ( https://webpack.js.org/ ) comes to use. Webpack is a module bundler. It takes the first JS file uses module definitions like commonjs / AMD / UMD etc and figures out the references and generates one Single JS file DURING COMPILE TIME. You can take this one single bundle JS and put in your web page. |
 |
So let's try to understand the basic's of how Webpack works.
So the first step is to install webpack. So open the node command prompt and type the below NPM command. Please see we have use "-g" the global flag.
npm install -g webpack
We take the same code which we have used in "Lab 4". In lab 4 if you see we have "Customer.js" calling "Address.js". So the first Javascript file is "Customer.js". We just need to give the first JS file name in the webpack command the final bundle file name. You can also see there is "�output-library" flag parameter. Webpack will expose "CustomerLibrary" component to us from where we can access the "Customer" class in the UI.
webpack "Customer.js" "Bundle.js" --output-library='CustomerLibrary'
So now that we have a single bundle we can just load the JS file in the webpage and access the classes via the "CustomerLibrary". Remember this "CustomerLibrary" is coming from command line, please revisit step 2 again for details.
<script src="Bundle.js"></script>
    <script>
        var x = new CustomerLibrary.Customer();
        x.Add();
    </script>
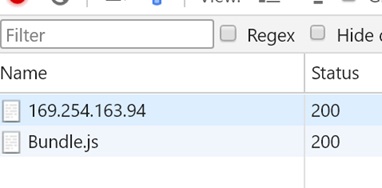
If you now see the network tab you will see now only one single file "Bundle.js" as compared to multiple files.
★SystemJS and WebPack. When we learn Angular we will first use SystemJS and then in one of the labs we will see how Webpack helps us.
So now that we have completed all the prerequisites it's time to start getting in to Angular. So from Lab 6 the actual Angular starts.